 Close
Close

How did it get like that?
By Will J Richard, on 26 April 2017
Grant Museum Visitor Services Volunteer Nicole Barber answers a question often put to her by the museum’s visitors…
How did it get like that?
Surrounded by the Grant Museum’s many exciting specimens, it’s not often you think of the painstaking preparation that went into each one before they were put on display. (Or at least I don’t, I’m usually far more interested in what’s in the case rather than how it got there.) The process of preparing zoological specimens is a lengthy one, involving some complicated and often quite gory techniques. The specimens in our collection have been pickled, taxidermied, pinned, stained, disarticulated, and re-articulated to make them educational and interesting to both researchers and the general public. We’ve previously explored some of the more unusual display techniques such as staining with red alizarin, or (and don’t pretend you don’t know which specimen this is) cramming things into jars, but what about our more traditional skeletal specimens?
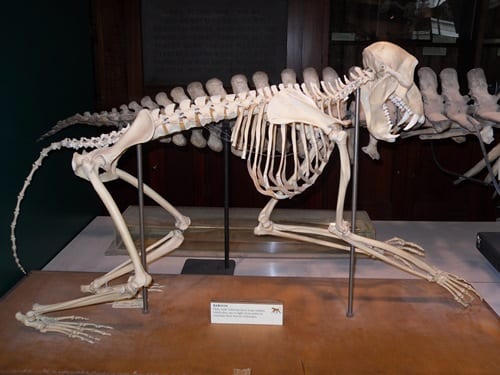
LDUCZ-Z2701 baboon skeleton
How are museum specimens stripped of flesh, cleaned and then repositioned for display?
Exposing the skeleton
The biggest task when preparing a skeletal specimen for display is removing the flesh. Although it is possible to deflesh a skeleton using chemical treatments, this can sometimes damage the bones. Instead many conservators choose a more natural method using the insects that dine on animal carcasses in the wild. Beetles belonging to the Dermestes genus, known as skin beetles, feed on dead and dried animal material. This usually makes them a museum pest, as they are often found snacking on stuffed animal specimens, or on specimens that weren’t totally stripped of flesh before being displayed or put in storage. For the purposes of skeleton preparation, though, they can be very useful for stripping smaller carcasses of flesh without doing them any damage. You can see them in action below, courtesy of the Natural History Museum. For the more squeamish readers among you, feel free to skip this and read on.
An alternative to using a dermestid beetle colony is maceration, which is essentially a controlled version of the decay a body would normally undergo after death, when bacteria begin to feed on the body cells (it appears that providing dinner for some organism or another is a feature of any good specimen preparation). The carcass is placed in a container with some water and kept at a constant temperature that encourages bacteria to thrive, and enzymes are sometimes added to soften the tissue and help the process along.
Both techniques can be used to strip skeletons of flesh without damaging them. In fact, their non-destructive nature makes them useful not just for museum specimens, but also in forensic cases where there may be valuable clues left on a skeleton.
Bleaching the bones
Once you’ve got your skeleton stripped, you’re left with the problem of the fatty acids and tissue that colour the bone and can leave it, for lack of a better word, greasy. To get nice, clean bones ready to display, it is often necessary to bleach them a little. This is usually done using hydrogen peroxide or another oxidising chemical compound, but at very low concentrations, and keeping a very close eye on the bones. Perfectly clean bones are great, but getting over-enthusiastic during this stage will lead to the bone tissue getting damaged. This can leave it chalky and brittle, which makes it very hard to re-articulate for display and leaves it vulnerable to further fracture or breakage.
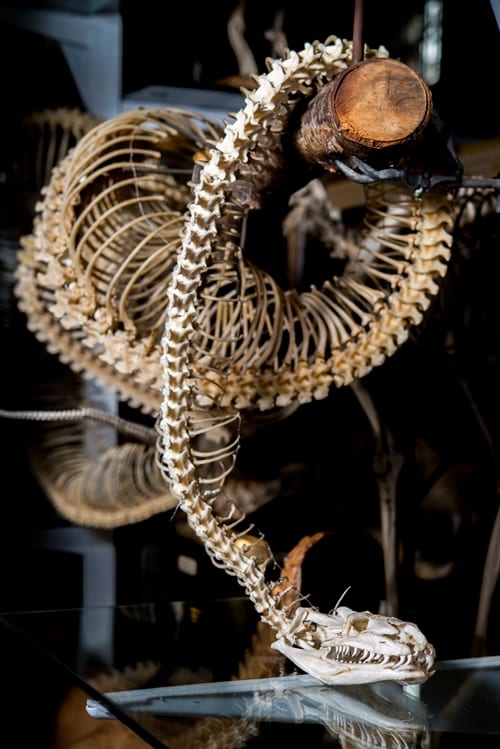
LDUCZ-X456 rock python skeleton
Re-articulation and mounting
The final stage of preparing a skeletal specimen is to re-articulate the bones and mount it for display. Reassembly is usually done with non-corrosive metal pins or wire, or sometimes using adhesive for smaller or more delicate elements. This requires anatomical knowledge, skill, and a lot of patience, particularly when positioning the skeleton in a more complex pose. The vast skeleton of our African rock python, for example, is displayed coiled around a branch. Five meters worth of vertebrae had to be carefully articulated to form the coils. Each pair of ribs was then attached to follow the curves of the vertebrae, making sure to keep them all in the correct order. Now imagine doing that for around 200 pairs of ribs and you get the idea!
References
Queensland Museum ‘Skeletons: Preparation techniques for display and research collections’
National Park Service Conserve O Gram ‘Vertebrate Skeletons: Preparation and Storage’
Museum of New Zealand ‘Tuatara skull preparation’
Nicole Barber is a Visitor Services Volunteer at the Grant Museum of Zoology and a UCL MSc Palaeoanthropology and Palaeolithic Archaeology student